Manual Mode Made Simple: Take Control of Your Camera and Your Photos
We all have that creative itch—the need to make something and express ourselves. The arts give us the freedom to do that in so many ways. Whether it’s painting, sculpture, or any other traditional form of art, there’s something special about getting your hands messy and physically shaping your vision. You have full control over what you create, and that connection feels personal and powerful.
Photography, though, has a bit of a different story. For a long time, the camera was seen as a kind of barrier between the artist and the artwork. It just captured whatever was in front of it, and the person using it was often thought of as more of an operator than a creator.
But that idea didn’t last forever. As photography evolved, artists started experimenting—using collage, abstraction, and composition to turn photography into fine art. They proved that the camera could be more than a recording tool; it could be a means of true expression.
Today, we have more creative control than ever. Modern cameras give us endless ways to shape an image. We’re not just pressing a button anymore—we’re making artistic choices every step of the way. Switching to manual mode might sound intimidating at first, but once you start experimenting, you’ll realize how rewarding it is. There’s nothing quite like knowing that every part of your photo—light, depth, mood—came from your own vision.
Let's begin, start by switching your camera from auto all the way to Manuel (this is indicated by the letter M on the dial). This is scary I know, but trust the process, once you have the basics you will never look back. By turning the mode dial to M you are already taking that fisrt step into creating you artistic vision.
Working in manual you need to know the three main components that you will need to get a proper exopsure. those are ISO, Aperture, and Shutter Speed. Each of these settings work together and when you change one you will have to adjust the others. It works like a pyramid.
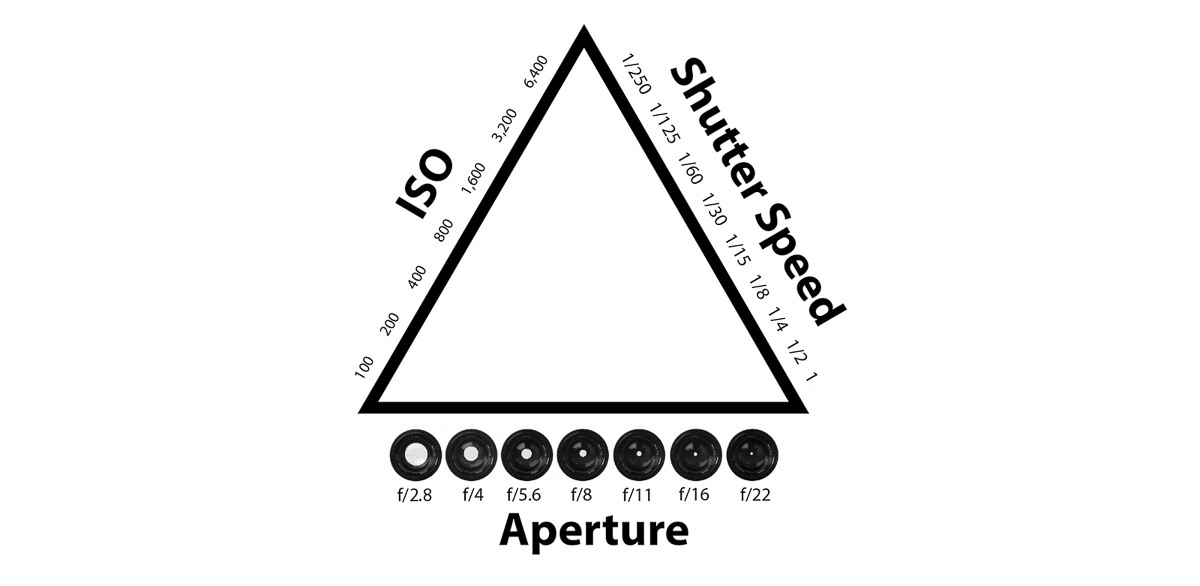
Each of these settings is important on its own, but together they’ll help you create images that go a step beyond “auto.”
Let’s start with ISO.
ISO stands for the International Organization for Standardization—yeah, that’s a mouthful! Luckily, we just call it ISO, and it’s not as intimidating as it sounds. In short, ISO controls how sensitive your camera’s sensor is to light.
A lower ISO (like 100 or 200) means your camera is less sensitive to light. These settings are perfect for bright, sunny days or well-lit indoor spaces. Lower ISOs also produce cleaner images with less “noise,” which is that grainy texture you sometimes see in darker photos.
A higher ISO (like 800 or 1600) makes your camera more sensitive to light, which helps when you’re shooting in low-light or nighttime conditions. The tradeoff? You’ll start to see more noise or grain in your photos.
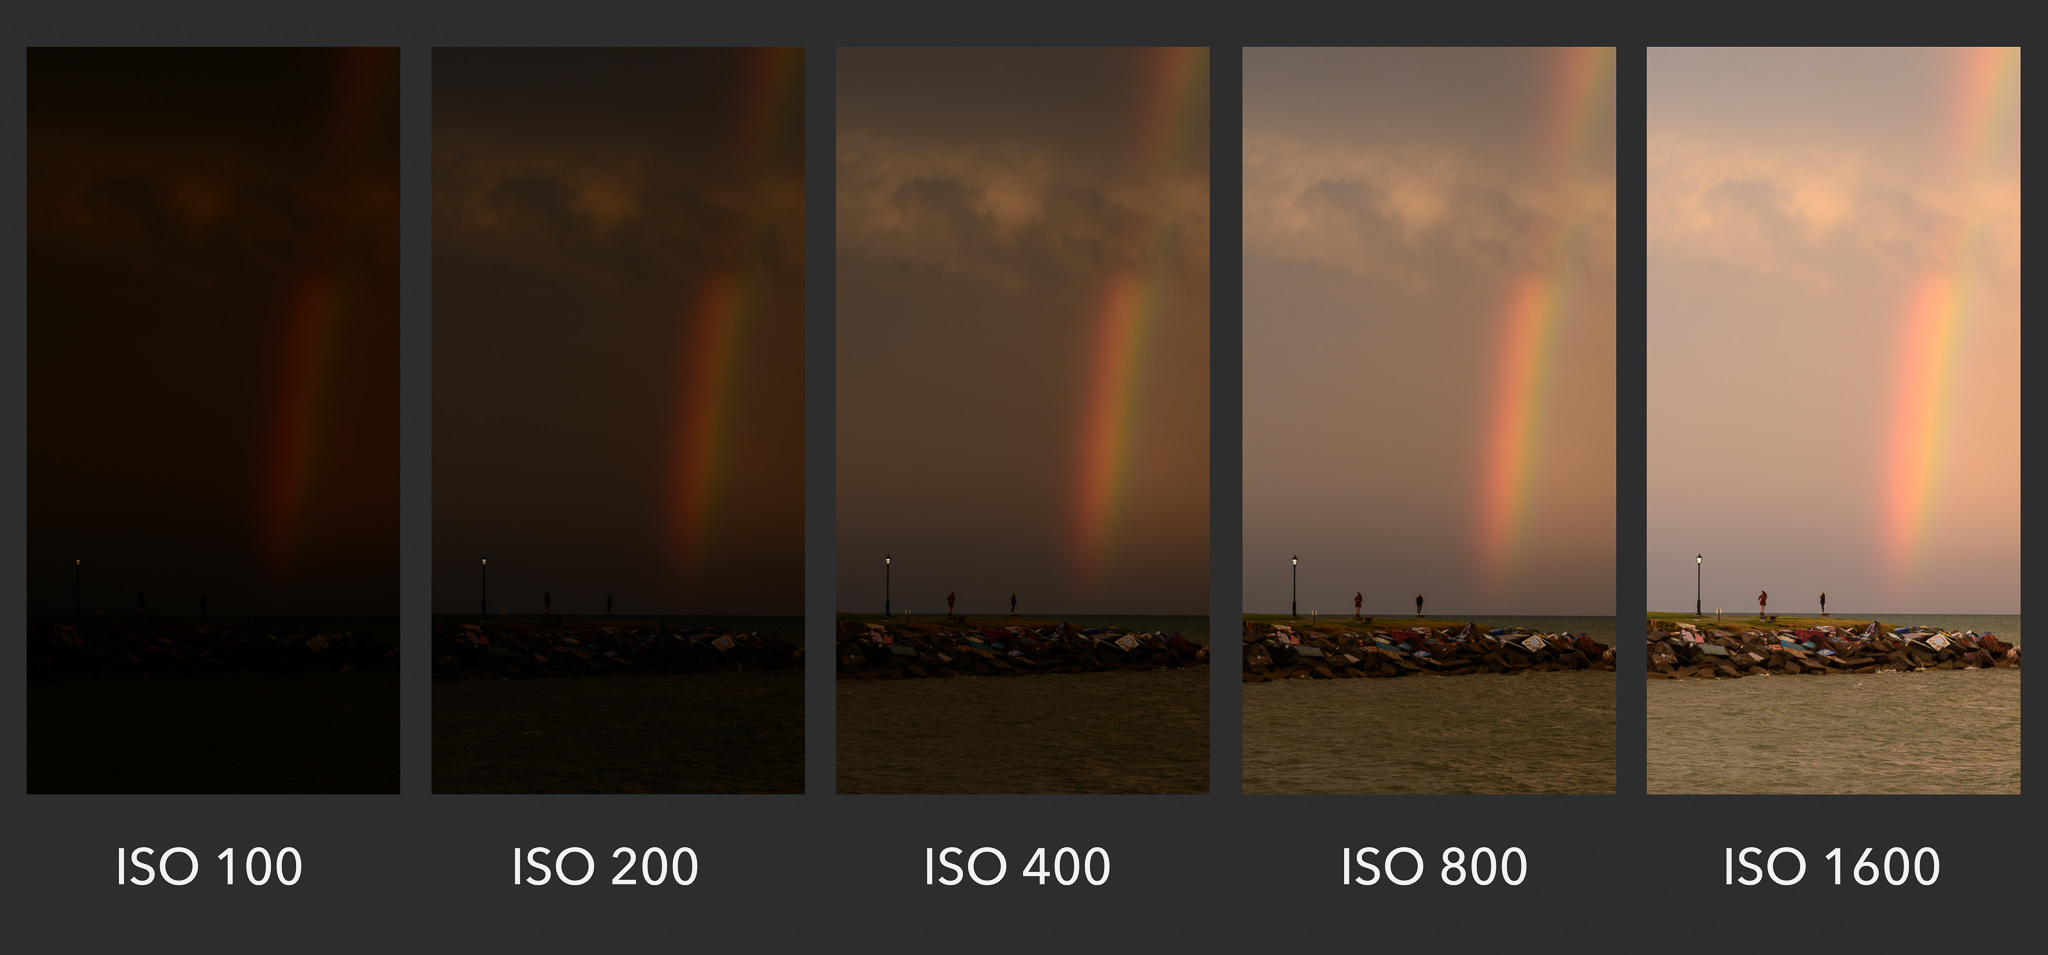
The photos below are a great example of how ISO affects an image. I often use this comparison with my students—it really helps visualize the difference. At a low ISO, there isn’t enough light hitting the sensor, so the image looks dark and lacks detail. As you raise the ISO, the camera becomes more sensitive to light and starts to record more information. That’s when details, like a rainbow in the scene, start to appear more clearly.
When you are choosing your ISO pay attention to your lighting and decide what ISO will work best for your situation. If you shoot at a High ISO like 1600 you will get a lot of noise or grain on you image.

Typically when I am shooting I try to keep my ISO between 200-400. These are where I can comfortably hand hold my camera and get very minimal grain/noise.
Perfect! Here’s how that would flow with the added “how to choose your ISO” section — still in the same friendly, blog-style tone:
Each of these settings is important on its own, but together they’ll help you create images that go a step beyond “auto.”
Let’s start with ISO.
ISO stands for the International Organization for Standardization—yeah, that’s a mouthful! Luckily, we just call it ISO, and it’s not as intimidating as it sounds. In short, ISO controls how sensitive your camera’s sensor is to light.
A lower ISO (like 100 or 200) means your camera is less sensitive to light. These settings are perfect for bright, sunny days or well-lit indoor spaces. Lower ISOs also produce cleaner images with less “noise,” which is that grainy texture you sometimes see in darker photos.
A higher ISO (like 800 or 1600) makes your camera more sensitive to light, which helps when you’re shooting in low-light or nighttime conditions. The tradeoff? You’ll start to see more noise or grain in your photos.
The photos below are a great example of how ISO affects an image. I often use this comparison with my students—it really helps visualize the difference. At a low ISO, there isn’t enough light hitting the sensor, so the image looks dark and lacks detail. As you raise the ISO, the camera becomes more sensitive to light and starts to record more information. That’s when details, like a rainbow in the scene, start to appear more clearly.
How to Choose the Right ISO
Here are a few quick tips to help you pick the right ISO for different situations:
-
🌞 Bright daylight: ISO 100–200 — great for outdoor shoots with plenty of sun.
-
☁️ Cloudy days or shaded areas: ISO 400 — adds a bit more sensitivity without too much noise.
-
🏠 Indoors with decent light: ISO 400–800 — helps brighten up without losing too much detail.
-
🌙 Low light or night shots: ISO 1600+ — boosts brightness, but expect some visible grain.
Remember, every camera handles ISO a little differently. Newer cameras can shoot at higher ISOs with less noise, so it’s worth experimenting to see what your camera can handle. The more you practice, the more you’ll start to get a feel for what looks right in different lighting conditions.
Now that we understand ISO, let’s talk about aperture.
Aperture refers to the opening inside your lens that controls how much light enters your camera. Think of it like the pupil of your eye—when it’s dark, your pupil opens wider to let in more light; when it’s bright, it gets smaller to block some out.
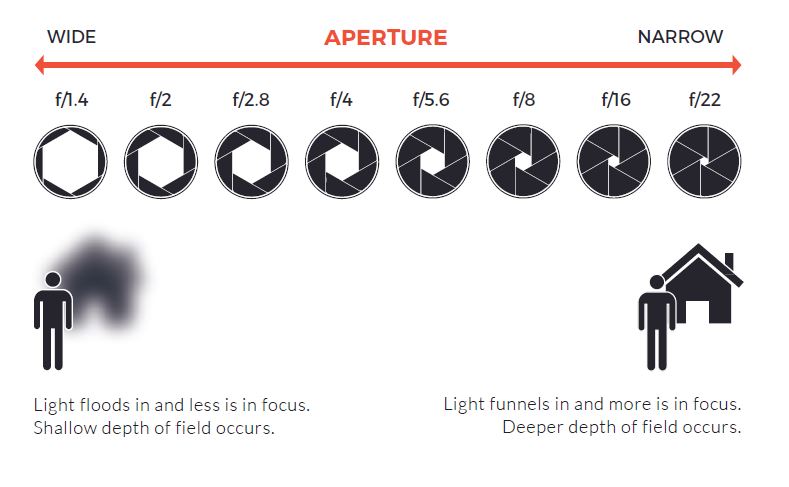
In photography, aperture is measured in f-stops (like f/2.8, f/5.6, f/11, and so on). Here’s where it can get a little tricky: a smaller f-number means a larger opening, which lets in more light. For example, f/2.8 is a wide aperture, while f/16 is a small one.
But aperture doesn’t just control light—it also affects your depth of field, or how much of your image is in focus.
-
A wide aperture (small f-number like f/2.8) creates a shallow depth of field, which means your subject is sharp while the background is beautifully blurred. This is perfect for portraits or close-ups where you want your subject to stand out.
-
A narrow aperture (large f-number like f/11 or f/16) gives you a deep depth of field, keeping more of your scene in focus. Landscape photographers often use this to make sure everything from the foreground to the horizon is sharp.
Your aperture setting works together with ISO and shutter speed to create a balanced exposure—but it also has a big impact on the style and feel of your photo.
And last but certainly not least—let’s talk about shutter speed.
Shutter speed determines how long your camera’s shutter stays open, which controls how much light hits the sensor and how motion is captured.
A fast shutter speed (like 1/1000 of a second) freezes motion. It’s great for capturing action shots—like a person running, a bird in flight, or splashing water—without any blur.
A slow shutter speed, on the other hand, keeps the shutter open longer, allowing more light in and creating motion blur. This can be a beautiful creative tool—think of silky smooth waterfalls, light trails from cars at night, or soft, dreamy motion in waves.
If you’re shooting handheld, a good rule of thumb is to keep your shutter speed at 1/60 or faster to avoid camera shake and blurry photos. If you go slower than that, it’s best to use a tripod to keep your camera steady.

Now that you know the basics of ISO, aperture, and shutter speed, you’ve unlocked the secret to taking control of your camera. These three settings work together to shape your photo’s brightness, sharpness, motion, and overall mood.
At first, manual mode might feel overwhelming—but don’t worry, every photographer starts there. The best way to learn is by experimenting. Try shooting the same scene while changing one setting at a time and see how it affects your image. Over time, you’ll start to notice patterns and gain confidence in balancing the three.
The beauty of manual mode is that you become the artist behind the camera—not just someone pressing a button. You decide how much light enters, how motion is captured, and what your final image feels like. And once that clicks, photography becomes so much more rewarding.
So go out, play with your settings, and don’t be afraid to make mistakes. Every photo—good or bad—is a step toward mastering your craft and creating the kind of images you’ve always envisioned.s

Comments
Post a Comment